

Today’s pattern launch day for my new Prairie Sundrop quilt! You’ll love this scrappy quilt that’s not only a fresh take on a flower block but it’s a great beginner pattern, comes with 8 project size options, and is fast and fun to piece for any skill level—less time sewing and more time enjoying!

For the cover version I used prints from my new Art Gallery Fabrics Heirloom collection and AGF’s Sienna Brick Pure Solids for the background. This combination looks great for summer and for fall!
Those fun Jumbo Alphabet Clips Letters are from Seams So Me and were perfect for keeping the pieces organized.

I had some extra time between making my quilt top and the launch that I went all out on this one and hand quilted it! I envisioned this quilt really puffy and to achieve the look I used two layers of Hobbs Batting Polydown Batting and hand quilted in the ditch (the seam lines). The only spots not stitched-in-the-ditch are in the side background rectangles. In those areas I mimicked the Stem blocks to keep the alternating Flower and Stem block arrangement going.

I like stitching-in-the-ditch mostly because there’s no need for marking the stitch lines and especially because it pops the quilt design. It’s also a great way for someone wanting to try their hand at hand quilting to hide those early attempts at stitching if your stitches are uneven or bigger than you’d wish. Select a thread color as close as possible to the main color of the quilt for best camouflage.

I very much enjoy hand quilting when I have the time and almost always hand stitch the binding on my quilts because I love the slow-stitching time to fully appreciate and bond with the quilt I just completed. My favorite thimble for years now has been these sticky leather thimbles from Colonial Needle Company. It’s the closest thing to not using a thimble but gives your fingers all the protection. Check out all their wonderful sewing notions with my affiliate link, HERE.

Kits for the cover twin version are available at Lady Belle Fabrics. I love how this quilt looks in a summer setting and that it’ll transition seamlessly into fall as well! Order the kit today and you’ll have this beauty pieced in no time!

I used the Eclectic Threads print from Heirloom for the backing and enjoy how a bold print can give a whole-cloth second look to your quilts. Don’t you just love that puff?? I’m obsessed with it!
The cover sample is the twin size but for the bedroom shots I turned the quilt on it’s sides and it fits across a double (full) bed, beautifully!

I also made the long table runner size option. Since getting our new (used) over 8 foot long dinning table I needed a longer runner so I have a short and a long runner version to choose from. Now, the long runner is long but still not long enough to drop over the sides of my table but I feel the proportions are very pleasing at 89-1/2” long.

Art Gallery Fabrics Heirloom was also used to make the runner but the Everyday Dishes print is the background for this sample with the Golden Days print in flannel for the backing.

Just to be completely contrary and show you how stitching in the ditch would look on a lower loft batting and by machine I finished the runner in the same method as the quilt. I used a fusible fleece and quilted on my machine. Not the pop of the puffy quilt but it creates a nice flat and stable surface for a runner.

When I was photographing my projects I had my quilt and the runner in the guest bedroom and temporarily laid the runner on the end of the bed. After seeing how pretty it looked there I realized that this long runner was the perfect size for a bed runner on a double (full) bed!

A bed runner is a nice way to add some color and coziness to a bed in summer when you don’t necessarily want a heavy blanket or quilt!
Meet the Testers
With every new quilt pattern I have a Tester Team of talented makers creating their own version in the various quilt sizes. Each Tester selects their own look, using Art Gallery Fabrics in their quilts. The results are not less than spectacular and makes a launch day into a virtual quilt show! Be sure to click on the links provided with each makers writeup to learn more about them and what they have to offer to the quilting community. Some of the makers are also shop owners and offer kits for their versions so watch for the Shop the Kit tag on the collages!
Alphabetical Order:
Elaine Satterfield
Elaine Satterfield’s soft and feminine style always shines through in her quilts. Owner of Create Joy Quilt Co., Elaine always creates such pretty things that reflect her joy of quilting. Elaine used prints from Art Gallery Fabrics Mix the Volume and Steele Pure Solids in her Prairie Sundrop baby quilt. See more of Elaine’s beautiful work on Instagram @createjoyquilt.

Sharon Holland’s Prairie Sundrop quilt made by Elaine Satterfield
Jen Cannon
Jen Cannon of Piper Autumn Fabrics curated a beautiful look for her Prairie Sundrop throw quilt with a floral background from Katarina Roccella’s Art Gallery Fabrics Botanist collection and AGF Pure Solids for the Flower and Stem blocks. Get the kit for this version at Jen’s ETSY shop and on visit her on Instagram, HERE.

Sharon Holland’s Prairie Sundrop quilt made by Jen Cannon
Joyce Ulm
Joyce Ulm used prints from my Kindred collection for Art Gallery Fabrics for the blocks and the Faint Vintage Charm print from Le Vintage Chic capsule collection from AGF to make this (long) patriotic table runner. Joyce does the long arm quilting on her quilts and chose a fun firecracker design for her runner. You can see more of Joyce’s work on Instagram @evamaescustomquilts, Etsy shop, and on her Facebook blog HERE, and takes custom orders for long arm quilting.

Sharon Holland’s Prairie Sundrop table runner made by Joyce Ulm
Katherine Clark
Katherine Clark of Katherine Elizabeth Quilts on Instagram makes everything she makes look like it came in fresh-picked from the garden. Katherine made a beautiful long Prairie Sundrop table runner using Katarina Roccella’s Florence collection from Art Gallery Fabrics for the floral background and sunny AGF Pure Solids for the blocks . This is the perfect summer palette for your table.

Sharon Holland’s Prairie Sundrop table runner made by Katherine Clark
Marija Vujcic
Marija mixed prints from my Juniper, Listen to Your Heart, and Shine On collections plus a solid all from Art Gallery Fabrics to make this beautiful long table runner that could bridge all the seasons. Learn more about how Marija free motion quilted her runner and other quilting tutorials by visiting her at Marija Vujcic on Instagram @maraquiltdesigns and on her blog at Mara Quilt Designs.
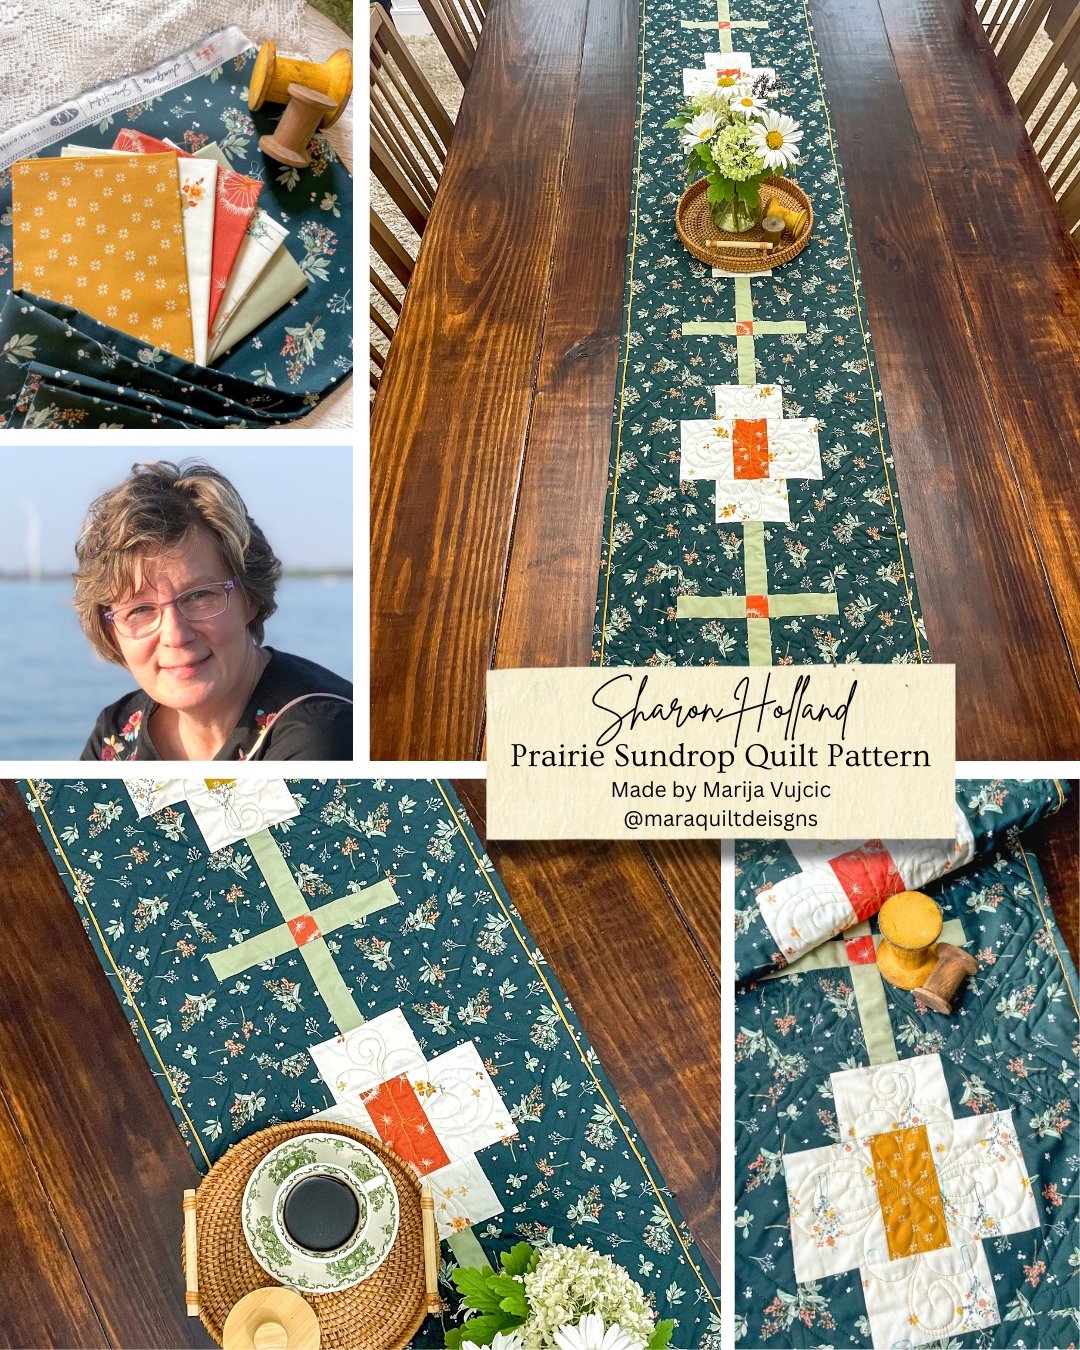
Sharon Holland’s Prairie Sundrop table runner made by Marija Vujcic
Melissa David
Melissa David of Quilting Above the Clouds on Instagram. Melissa made not one but two Prairie Sundrop samples! Her first make is this gorgeous Prairie Sundrop throw quilt with assorted prints from different Art Gallery Fabrics collections and my Delicate Balance print as the background. Melissa does her own long arm quilting on her quilts and this is an exquisite throw.

Sharon Holland’s Prairie Sundrop quilt made by Melissa David
Melissa David’s second Prairie Sundrop make was a short table runner using prints from my Shine On collection for Art Gallery Fabrics. She used the same panto on both samples and it looks beautiful on both projects.

Sharon Holland’s Prairie Sundrop table runner made by Melissa David
Tamara Darragh
I love how Tamara Darragh used my Heirloom collection for Art Gallery Fabrics and curated a completely new look for her throw quilt from my twin quilt and table runner with the same collection. Tamara added the Handkerchief Sage print from AGF Hazelwood and used my Eclectic Threads print as the background fabric for a vintage-boho inspired quilt—I love it! See more of Tamara Darragh of Remi Vail Studio on her website and of Tamara on Instagram, HERE.

Sharon Holland’s Prairie Sundrop quilt made by Tamara Darragh
Tracey Taber-Perry
Tracey Taber-Perry never disappoints! Her eye for combining prints and colors creates the prettiest quilts and her TWO Prairie Sundrop throw quilts are proof! Tracey selected fabrics from Maureen Cracknell’s Homebody (first collage below) and Maven (second collage below) collections for Art Gallery Fabrics. This talented maker can be found on Instagram, HERE.

Sharon Holland’s Prairie Sundrop quilt made by Tracey Taber-Perry
Both Tracey’s sample quilts are beautifully quilt with an all-over design. It’s so fun to see how the Prairie Sundrop quilt looks with a patterned or a blender background.

Sharon Holland’s Prairie Sundrop quilt made by Tracey Taber-Perry
Victoria Newmyer
Victoria Newmyer has a knack for curating beautiful bundles and I was thrilled when she reopened her shop earlier this year. This beautiful Prairie Sundrop throw quilt of Art Gallery Fabrics Pure Solid background and Bonnie Christine’s Wild Forgotten prints is available as a kit from Victoria’s shop. Be sure to visit Victoria’s beautiful Instagram account @midlife_quilter and her shop, HERE for fabrics and notions.

Sharon Holland’s Prairie Sundrop quilt made by Victoria Newmyer
Are you inspired to make a Prairie Sundrop quilt? It’s such a fun quilt to make that I’ll be making another this fall with a new collection coming out in September! But, more about the new collection later on a future post—let’s just enjoy what’s left of summer right now and work on our stashes sewing with this new scrap quilt pattern. :)
Happy sewing,
