Hold Tight Quilt Pattern Update

Hold Tight Quilt Pattern Update

Hold Tight Petite by Sharon Holland

Hold Tight Petite by Sharon Holland

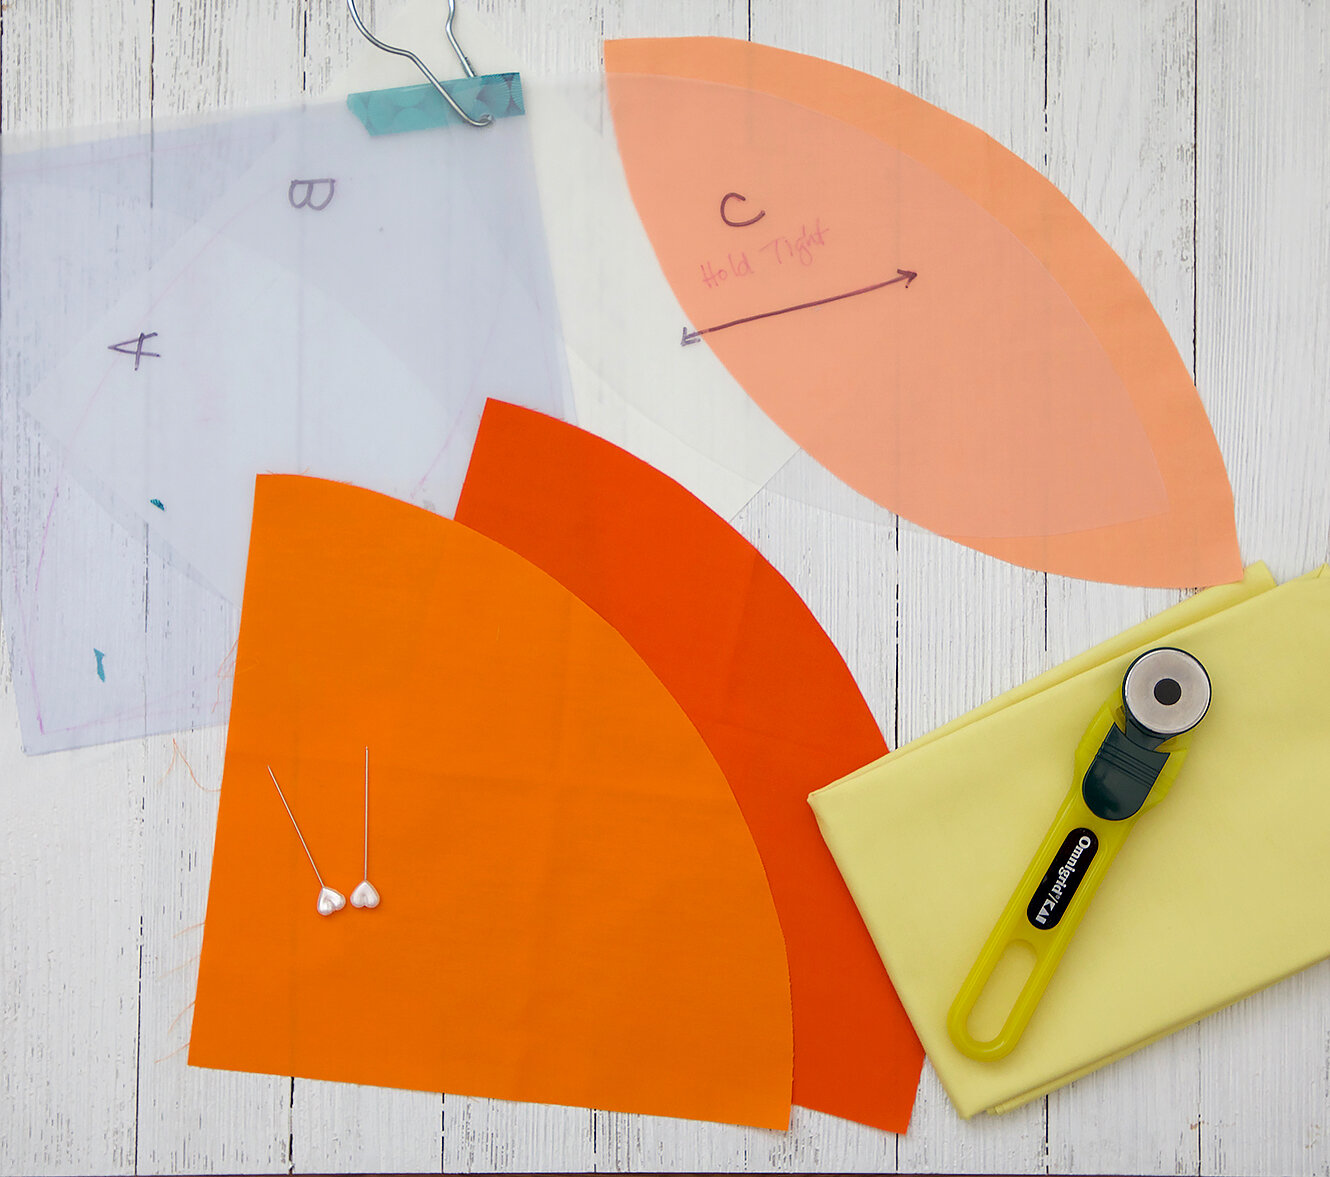
I’ve an important update for those who’ve purchased my Hold Tight quilt pattern and an apology for any frustrations the B template may have given you.

The original version of this pattern included an 8-1/4” square B template that proved troublesome to print out because one side would get cut off in the printing margin. On the second version I trimmed down the tips (just the tips, not the entire shape) to make the template 8” square and easier for printing. Neither one of these were acceptable and I am sorry for my dropping the ball on this one.

Well, third times a charm because this updated template that you can download for free from the Sew Along page prints out fully and is back to the original 8-1/4” square size. Please note, you’ll need to tape it together before creating your plastic template. It’s a happy medium compromise between the two problems.

The new B template page looks like the image above and you can download a print out HERE. Do not drag, screen shot, or use the image above as it is not a PDF quality for use. Instead, download the PDF from my Sew Along page.

Once you have the new B template PDF, you’ll need to print it to scale and carefully cut out the B1 and B2 shapes. Use the arrows to tape the two shapes together to create an 8-1/4” square B template. Transfer this full (whole) shape to your template plastic and follow the cutting instructions as given in any version of the Hold Tight quilt pattern.

Having this larger size B shape doesn’t change the curve of the template or how it’s pieced, it only gives you more wiggle room for sewing the curved pieces together and for trimming the block up to size using your Trimming template that’s included in the pattern—and who doesn’t love more wiggle room!?!?!

Hold Tight Petite Cutting and Piecing.jpg

My sincere apologizes to anyone that’s had struggles with the cutoff print version or the smaller B template version of this pattern. I’ve uploaded an amended Week #2 video to YouTube explaining this update, so if you follow my YouTube channel and this blog then this blog post will cover the same information that the “new” video covers.

Any new pattern purchases of the Hold Tight quilt will reflect this B template change. You do not need to repurchase the pattern to get the updated B template page. Simply download a free page 11 B Template PDF from the Sew Along page.

I am an Amazon Associate site and earn from qualifying purchases on the products I’ve linked below. The helpful products selected are the same or similar to materials used to make the project(s) in this blog post or related items I think you may enjoy.

Hold Tight Petite Sew Along - Finishing

Hold Tight Petite Sew Along - Finishing

Hold Tight Petite Sew Along W3.jpg

It’s the final week of the Hold Tight Petite Sew Along and today’s post will cover assembling the blocks in a Quilt As You Go (QAYG) quilt sandwich or assembling the top and making a traditional quilt sandwich, quilting, hand quilting and binding.

As Blair Stocker’s Wise Craft Ruby Ruler™ Ambassador series August Ruby Ambassador (Read my interview by Blair—here) I thought what better way than collaborate with Blair on the Petite Sew Along and use her rulers to help navigate color and value in a fun quilt project.

Here’s what we’ve accomplished in three weeks:

marketing campaign.jpg

Blair’s ruby-hued artist’s viewfinder tools the Ruby Ruler™ and Ruby Minder™ where invaluable tools in the first week’s study on Color and Value. I blogged about how, as a designer, I go about selecting colors for my fabric collections or a color story for a quilt and how I used the Ruby Minder™ to check my selections of Art Gallery Fabric Pure Solids. If you missed the first week, read more here. Plus you’ll find additional color theory materials covered on Week #1 and Week #2 of the original Hold Tight sew along as well as in the skill-building demonstration videos. Find these helpful videos on my Sew Along page which are available for viewing any time.

To catch up on what happened during week 2, read my Cutting & Piecing blog post here. Use templates to cut out shapes and sew curves with ease. Find out how with my videos for Week #2, #3 Part 1, and #3 Part 2 on the Sew Along page.

During the Hold Tight Petite sew along, Blair Stocker will be following up my Wednesday morning blog posts with a Facebook Live session. This workshop-like experience with Blair on Facebook is a huge bonus along with connecting with more than 1,500 other quilter’s via Blairs private Facebook group! Blair will host live sessions to support my sew along blog posts and share with you her expertise. Note: Blair’s FB group is free to join by answering three questions when requesting to be added to the group. If you can’t join in the live sessions—no problem—the videos are available for replay and ready to view when you are!

Hold Tight Petite quilt by Sharon Holland

Hold Tight Petite quilt by Sharon Holland

This sew along is free to join—no sign up forms—just follow along and have fun. You’ll will need, however, the Hold Tight quit pattern. If you don't have my Hold Tight quilt pattern already, you'll want to purchase the Hold Tight PDF pattern from my Shop page. The Hold Tight pattern now includes two sizes—the original over-sized throw and the new petite crib-size quilt. The material lists, cutting requirements, coloring sheet, and full-size templates are part of the fully illustrated PDF pattern. These sew along blog posts serve to supplement the PDF but don't provide the detailed pattern information that you'll find in the PDF available for purchase. If you’ve purchased the original PDF prior to August 5, 2019 and didn’t receive a special newsletter email from this blog sharing the link to the Petite Add-On download, see my SEW ALONG page to get your copy of the bonus size. You’ll find the Add-On download that contains the crib-size material list, cutting guide, and coloring sheet. Note: You’ll still need the original Hold Tight pattern for quilt details. The current PDF in my shop has been updated with both quilt sizes so patterns purchased after August 5, 2019 include both quilt sizes—no add-on necessary.

WEEK #3 - QAYG and Finishing

I like options, don’t you? I also like to be able to quilt my own quilts. The original large throw-size Hold Tight quilt and the new Petite crib-size quilts are both nice size quilts for trying machine quilting on your sewing machine as well as adding some decorative hand quilting for the balloon strings.

Hold Tight quilt throw-size by Sharon Holland

Hold Tight quilt throw-size by Sharon Holland

For tips on how to machine quilt a traditional quilt sandwich (quilt top, batting, and backing sandwich), like the quilts from my first Sew Along (above), see Hold Tight Sew Along Week #4 blog post.

For those wanting to try Quilt As You Go (QAYG) keep reading as I walk you through how I finished my Petite Hold Tight quilt.

QAYG

Hold Tight Petite by Sharon Holland

Hold Tight Petite by Sharon Holland

My QAYG finishing method is a hybrid of QAYG and traditional quilting to secure block rows to a batting and backing sandwich. Once the horizontal rows have been stitched down to the batting/backing in a QAYG row assembly, the finishing of the quilt is more traditional with the addition of machine or hand stitching.

The quilting on my Petite crib quilt is minimal. The quilting stitches are about 4’’ apart and I could get away with this because I used Hobbs Tuscany Premium Polyester Batting for my batting. The beautiful loft of Hobbs Tuscany Polyester adds to the puffy balloon look and makes for a snuggly-warm quilt and doesn’t shrink.

Securing Horizontal Rows in QAYG

Once all the block are made and squared up see Week 2, sew the blocks into horizontal rows. This is the same for either size quilt.

Hold Tight horizontal rows-02.jpg

Cut and piece backing according to the pattern directions and for the size quilt you’ve selected. I selected Paper Flowers Aurora from my Tapestry collection for Art Gallery Fabrics as the print for my backing. Cut batting to size indicated on pattern. Hand or spray baste batting to backing to prepare for QAYG assembly. See Sewcial Bee Sampler Quilt Finishing post for spray basting batting to backing.

Hold Tight Petite QAYG-01.jpg

Just as if you were assembling a quilt top, place the first two rows to be stitched right sides together, seams nested and edges matched. Pin at seams.

You can start from the bottom and working your way up, like I did (see above illustration) or begin from the top of the quilt and work down—the results will be the same. Center the pinned rows onto the batting/backing near the bottom if working up or at the top if working down. Pin row assembly to backing/batting. Stitch with a 1/4’’ seam allowance through all layers, removing pins as you sew.

Hold Tight QAYG 4.jpg

Carefully press the top row open and pin the flipped row down to hold flat. I like to roll the quilt batting/backing for easier handling.

Hold Tight Petite QAYG Assembly

Hold Tight Petite QAYG Assembly

Continue adding additional rows in the same manner. Press rows open as you go and continually check that the quilt top is flat and the backing is smooth with each row addition. Remove basting stitches if you hand basted the batting/backing layers.

Hold Tight QAYG 2.jpg
Hold Tight QAYG 3.jpg

After all the horizontal rows have been added, machine or hand baste around the outside edge of the quilt with an 1/8’’ seam allowance to secure the outside block edges. Note: Leave the excess batting/backing until all the quilting is finished.

Hold Tight Petite close.jpg

At this point you have the top secured to the batting and backing but will need to add more quilting. You’ve basically better-than-basted your top to the batting and backing. Quilt as desired or you can go minimal like I did and machine or hand quilt in the ditch along the vertical seams. I hand quilted my vertical seams with 40 wt. cotton thread so it wouldn’t be very noticeable. You can just see some stitches if you look at the orange balloon in the above photo. You’ve now secured all the blocks down in a grid.

Ruby Minder 1.jpg

For the rest of the quilt I selected four DMC Perle cotton threads and hand stitched 1/4’’ from the seam lines to echo the balloon shapes. I love how Blair’s Ruby Minder™ ruler also doubles as a thread minder!

To determine where my balloon strings should go and to avoid having to put marks on my quilt to get the straight guide lines, I used tape to mask out my lines. Watch how to hand quilt using floss and how to use tape as a guide, here.

Quilt Binding Sharon Holland.jpg

Once all the quilting is completed, add binding according to the pattern’s instructions. Trim batting and backing to edge of binding. Turn binding to the back of the quilt and hand or machine stitch to finish.

Hold Tight Petite by Sharon Holland

Hold Tight Petite by Sharon Holland

I hope you’ve enjoyed this petite quilt along and a further chance to play with with fun pattern, learn more about working with color and value, and sewing with curves. The Hold Tight Petite quilt is the perfect crib-size quilt and I love the puffy batting for it’s warmth and drape. My grandson needs a second quilt that he can drag around and snuggle with and he’ll be getting this one when I see him next month.

I’m excited to see Blair’s finished quilt and would love to see yours too! If you’re on Instagram, tag me @sharonhollanddesigns and Blair @blairs use the #holdtightquilt or #holdtightsewalong hashtag so we can follow your progress. If you’re sewing with Art Gallery Fabrics be sure to tag #artgalleryfabrics too! Don’t forget that you can join Blair’s Facebook group and meet others working on this quilt along with value and color insights from Blair’s expert knowledge of the subject.

Thanks for sewing with us!

Hold Tight Petite Sew Along, Begins!

Hold Tight Petite Sew Along, Begins!

Hold Tight Petite Graphic weeks.jpg

You’ve heard right, I’m hosting a sew along and it starts, today!

As part of Blair Stocker’s Wise Craft Ruby Ruler™ Ambassador series and being August’s Ruby Ambassador (Read my interview by Blair—here), I thought it would be a fun collaboration to merge my Hold Tight quilt and Blair’s ruby-viewer into a sew along workshop-like experience!

Ruby Ambassador Sharon Holland.jpg

Hosting a new sew along is the perfect way to introduce you to Blair’s ruby-hued artist’s viewfinder tools the Ruby Ruler™ and Ruby Minder™ and to continue our exploration of selecting color and value for your quilts that we started in the first Hold Tight Sew Along. The extra bonus to this sew along is the opportunity to connect you to more than 1,500 other quilter’s via Blairs private Facebook group where Blair will have live workshop-like sessions to support my sew along blog posts. Note: Blair’s FB group is free to join by answering three questions when requesting to be added to the group. If you can’t join in the live sessions—no problem—the videos are available for replay and ready to view when you are!

Wise Craft Ruby Ruler™

Wise Craft Ruby Ruler™

This sew along is also free to join—no sign up forms—just follow along and have fun. You’ll will need, however, my the Hold Tight pattern. If you don't have my Hold Tight quilt pattern already, you'll want to purchase the Hold Tight PDF pattern from my Shop page. The Hold Tight pattern now includes two sizes—the original over-sized throw and the new petite crib-size quilt. The material lists, cutting requirements, coloring sheet, and full-size templates are part of the fully illustrated PDF pattern. These sew along blog posts serve to supplement the PDF but don't provide the detailed pattern information that you'll find in the PDF available for purchase. If you’ve purchased the original PDF prior to August 5, 2019 and didn’t receive a special newsletter email from this blog sharing the link to the Petite Add-On download, see my SEW ALONG page to get your copy of the bonus size. You’ll find the Add-On download that contains the crib-size material list, cutting guide, and coloring sheet. Note: You’ll still need the original Hold Tight pattern for quilt details. The current PDF in my shop has been updated with both quilt sizes so patterns purchased after August 5, 2019 include both quilt sizes—no add-on necessary.

Hold Tight Petite Sew Along W1.jpg

Week #1 - Color and Value

Welcome to Week #1 of the Hold Tight Petite Sew Along! For this blog post and the following two posts, I'll share tips and tutorials to bring your quilting skills to a new level. In three weeks you’ll no longer be hesitant about working with color and become confident about stitching a quilt with curves!

From now until August 21, 2019 I'll break down the key components of the Hold Tight quilt pattern into three manageable tutorial blog posts. These tutorials will be useful to anyone working with fabric and patchwork regardless what quilt you’re stitching. In addition to my written posts, I’ve adding skill-building demonstration videos from the first Hold Tight sew along. Find these helpful videos on my Sew Along page and can be accessed at any time. Plus, for this Hold Tight Petite sew along, Blair Stocker will be following up my Wednesday morning blog posts with a Facebook Live session at 3:30pm PDT covering the same topic that same afternoon!

Pure Solids Selection.jpg

For this sew along I’ve designed a 6-balloon Hold Tight quilt using Art Gallery Fabrics Pure Solids. This crib-perfect size is not only quicker to make than the original quilt because there’s fewer blocks but also has a manageable number of colors needed to achieve the balloon shapes and transparency effects between balloons. Either size you choose to make the principles of color selection and construction are the same.

Where to Begin When Choosing Colors

The Ruby Ruler™ and Ruby Minder™ rulers are perfect for helping to see values between colors by reducing hues to gray scale—allowing you to see value changes. But what does it mean when I say, value?

Value is the darkness or lightness of a color (hue). A high value change between colors can also be called contrast. Black and white have high contrast. A low value change between colors can be called tonal, making the changes (or steps) between the colors subtle and less noticeable.

Let’s assume you’re NOT working with a kit or fabric collection that a designer has already determined the color story. Most of you will be working from your stash of solids and/or purchasing fabrics for your Hold Tight quilt. Where do you begin in selecting colors and how do you get the transparency effect?

The answer is to think like a designer and artist. So as not to overlap too much on the great information I’ve already covered on Week #1 and Week #2 of the original Hold Tight sew along, I’ll cover aspects of color and value as I use them in my surface pattern design, artwork, and quilts. Be sure to take a look at those earlier posts if you’re wanting more insights into Color.

My Process

I’ve introduced you to the trick of using inspiration images for color selection on the Community Sampler Week #1 post and like I said, on Week #2 Hold Tight Sew Along. I used this same approach when selecting the colors for my fabric collections and my finished Hold Tight Petite quilt. Now, let me walk you through the process….

Spirited by Sharon Holland

Spirited by Sharon Holland

My next Art Gallery Fabrics fabric collection Spirited comes out November 2019. Before I even begin designing prints I consider the season the fabric collection will be released—in this case fall. Then I think about the mood of the collection or what sort of story I want to tell—this very much influences color, values, and of course print designs. When you’re selecting fabrics for a quilt you may subconsciously be asking these same sort of questions: What room will I be using this in, who is this quilt for and do they have favorite colors, what story or mood, energy, or feeling should this quilt have.

After I have my brief or concept from those initial questions, I then go to my iPad and start poking around on Pinterest. I start a private folder to gather my ideas and allow myself to go down that rabbit hole. For your assignment, I want you to do the same thing but try not to think literally (like in this case, balloons) —just explore a wide range of images. You’re bound to have a couple beautiful images jump out at you that check off all the boxes in those initial questions. You’re golden when you can find one or two—that’s all you need—that sum up your vision in that image. Here’s the four Pinterest-pulled images that were the color and storyline inspiration for Spirited. You can view all the prints from the collection, here.

Storyboard images pulled from Pinterest

Storyboard images pulled from Pinterest

I used this exact same concept to develop the palette for my Hold Tight Petite quilt and I’ll go further into exactly how I extracted the colors from my inspiration images for my collection and for my quilt.

Inspiration images pulled from Pinterest

Inspiration images pulled from Pinterest

Because I’m heavily influenced by my upcoming fabric collection and craving fall colors (my favorite season) I found myself wanting earthy hues and an ethereal, muted palette and had that as part of my brief. Nature has always been an inspiration for me in my art so I started a search on butterflies and found these two images that I thought would make a nice color story. It’s a rather limited palette of chartreuse, gold, burnt orange, rust, cornflower blue, and lavender. I could’ve easily extracted the green in these images but instead decided not to introduce that color into the analogous/complimentary scheme that was happening already.

An analogous palette is one where shades (black added), tints (white added), tones (gray added) of hues (colors) lie next to each other on the color wheel. Complimentary colors are two hues directly opposite each other on the color wheel and include the shade, tint, or tone of those hues.

Knowing that the 6-balloon quilt has spots for four transparencies I was conscious to select colors that if mixed could yield plausible transparency colors. See Hold Tight Sew Along Week #1 post from the first sew along—it talks all about color mixing.

Extracting Colors

I’m fortunate to have a lot of design tools in my bag of tricks and I use Illustrator or Photoshop to extract colors from images. I don’t have any specific suggestions but I’m certain there’s many wonderful apps available that you can do on your phone and get the same sort of results—just do some looking around.

I import my images into my program and use the eye-dropper tool to extract a color I like from the image. Of course one could go crazy pulling colors so I limited my pull to eight on my initial pull—knowing my background was going to be off-white, I didn’t need to include that in my selection.

What I was aiming for in my initial eye-dropper extractions was a pleasing range of colors of similar value (darkness or lightness) to maintain my idea of etheral but yet, if I were to line up those selected colors from darkest to lightest there would be a noticeable change in value steps. In my fabric design, artwork, and quilting I try to have one or two value steps between colors that will be touching so they can stand out from each other. You can see that in my above example the colors almost step dark, light, dark, light….

Remember, my background is going to be off-white which in my quilt will be the lightest value. Any of the colors from my initial pull will have enough contrast next to the off-white fabric. So, if your quilt has a medium value background you will want to be pulling a lot of light and dark fabrics for the balloons.

From that initial pull I (with the use of my Adobe program) I then let the computer select the nearest Art Gallery Fabrics Pure Solid color (that I’d preloaded into my program). You can see the results of what the computer selected as the nearest equivalent. As for my textile designs I have all the Pantone colors preloaded into my program and do this exact same process on my first pass to creating a color story for a collection.

But what if you don’t have access to computer programs or apps? Go old-school and manually compare your fabric swatches. Here’s some ideas:

  • Print out inspiration photos

  • Take your own photos that could yield an interesting color story

  • Use watercolors or paints

  • Pull physical items from around your house that have colors you love

  • Use a painting or colorful printed fabric

  • Take a walk in a garden or museum

Getting Real

Now it’s time to get off the computer and start pulling fabrics in real life. I took my initial Pure Solids results to my sewing room and spread out my stash of Pure Solids to compare the print out to actual fabric. Here’s where your design instincts, the Ruby Ruler™, and your personal preference will go to work.

Hold Tight Petite Fabric Selection.jpg

The Goldilocks Syndrom

  1. The first photo is the fabric pull based on the initial computer generated AGF Pure Solids selection with two exceptions: The removal of PE-421 because it was too close in value to another fabric and PE-460 because it was too dark compared to the rest of the pull or too high of a contrast. I exchanged those fabrics with PE-485 and PE-457 and that’s what you’re viewing in this first photo. Colors don’t always translate perfectly from screen to reality, so it good to see them in person. I also wasn’t feeling the lavender (although its a gorgeous color and I so wanted it to work!). Viewing the lavender with the Ruby Minder™ I could see it was too bright or a pure a color (one without as much gray added) and not muted enough to play well with the vision for my color story. It threw a bit of a cog into my color wheel (ha ha).

  2. The second image shows that I’ve replaced the lavender with a mid-tone gray but when viewing the new selection through my Ruby Minder™ the gray and the blue were too close in value—making it ineffective as a transparency choice.

  3. For the third photo I selected PE-432, a lighter gray with a hint of yellow undertones so it related to the honeydew yellow. This color selection actually made more sense as a transparency color between the blue and the light yellow even though in reality mixing those two colors would produce a green—I wasn't going to bring green into my palette so this was my best neutral that would convincingly work as a transparency. A quick confirm with my Ruby Minder™ and it was just right!

Sharon Holland_sewing room_studio.jpg

I cut out all my pieces and put them up on my design wall to double-check my selections before starting to sew. It’s hard to see the off-white background pieces against my white design wall, but they’re there. I used my Ruby Minder™ again to negate color and view my pieces in gray scale to see if the transparencies and balance was cohesive. That’s when I did just a bit more tweaking to color placement from my original plan and added in a ninth balloon color of PE-484 for a smoother transparency between the lightest yellow balloon and the dark gold balloon.

Hold Tight Pure Solids Selection.jpg

Here’s my final fabric pull for my Hold Tight Petite quilt and I’m super happy with how it looks and relates back to my inspiration photos and brief for this quilt. I’m excited to see what Blair selects for her quilt and would love to see your inspiration for your color story and fabric pull, too! If you’re on Instagram, tag me @sharonhollanddesigns and Blair @blairs use the #holdtightquilt hashtag so we can follow your progress. If you’re sewing with Art Gallery Fabrics be sure to tag #artgalleryfabrics too! Don’t forget that you can join Blair’s Facebook group and meet others working on this quilt along with value and color insights from Blair’s expert knowledge of the subject.

Blair also has a wonderful online class, Make Modern Scrap Quilts Using Color Value which is an evergreen class—you buy its and it’s yours forever, there are no "sessions". Read more about this class on Wise Craft Handmade.

Looking Ahead

Hold Tight Petite Graphic weeks.jpg

This first week has been all about color and value and making your fabric selections for the size quilt chosen. If you’d like to work ahead and begin cutting out your materials you can reference the Cutting Templates and Fabrics video from the first sew along as well as the additional tutorial information found on the corresponding blog post from the first sew along.

Otherwise on week two I’ll blog about Cutting & Sewing Curves and Blair will being cutting and piecing live on Facebook. We’ll also have a fabulous giveaway from myself and Art Gallery Fabrics of a Hold Tight Petite Quilt Kit consisting of the pattern and the exact Pure Solid colors I used in my Hold Tight Petite quilt along with your choice of any AGF print for the backing! More details on that giveaway next week. Note to anyone winning a Hold Tight quilt pattern on this SAL that’s already purchased the pattern—we can substitute with your choice of a different PDF pattern from my SHOP.

Looking to week 3… I’ll be covering how to finish your quilt in a Quilt-As-You-Go method (QAYG) and talking about the hand quilting I did on my sample. If you’re interested in QAYG —don’t sew all your blocks together if working ahead! We’ll need the blocks as (horizontal) rows for securing to the batting and backing. More about that on the final week.

Hold Tight Petite Quilt-As-You-Go quilt assembly peek

Hold Tight Petite Quilt-As-You-Go quilt assembly peek

Week #1 Giveaway

Hold Tight Petite Pattern & Ruler Giveaway.jpg

Right now, over on Instagram, Blair and I are holding the first giveaway. Visit my IG feed @sharonhollanddesigns and enter to win a Hold Tight quilt pattern and Ruby Minder™ ruler for yourself and a tagged friend! Follow the giveaway rules on the post. Look for the post giveaway image on my feed just like the one above and enter by commenting. Two pairs of friends will be randomly drawn from the comments on around 4 pm Eastern Friday, August 9, 2019 and notified on Instagram.

Both giveaways for this tour will be held on my Instagram account @sharonhollanddesigns. Be sure you’re following myself and Blair @blairs and Art Gallery Fabrics @artgalleryfabrics so you don’t miss a thing!