Trimming HST and Flying Geese Units

Trimming HST and Flying Geese Units

IMG_0173 copy.jpg

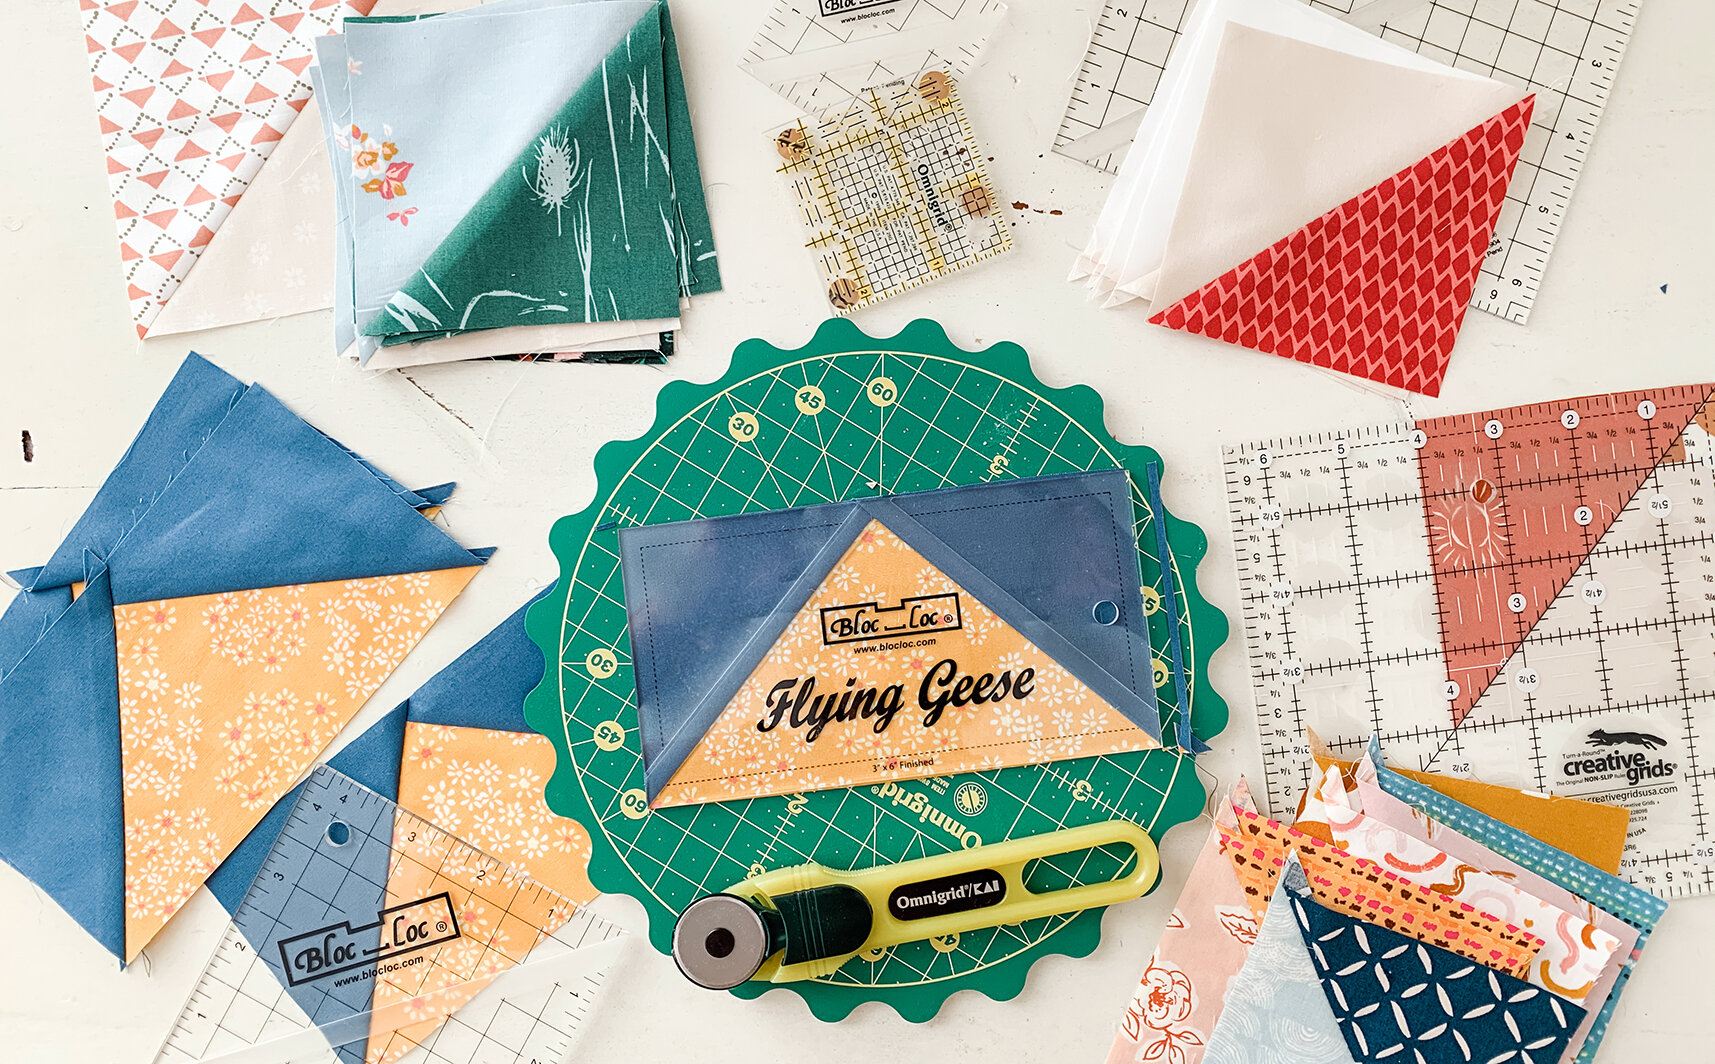
As a pattern designer I strive to make my patterns as easy as possible for all level of quilters to follow and for each maker to finish their quilt with true to size blocks and sharp points on units like Half-Square Triangle units (HST) and Flying Geese Units. Tips and tutorials make for better patchwork and in a recent discussion with my quilt testers group I realized many newer quilters are unsure of how to trim up units like Half-Square Trangkes and Flying Geese.

You’ll find many tutorials on this blog about how to make these different sort of units but I’ve not addresses directly on how to trim these units down to size if you don’t have specialty rulers like my favored Bloc_Loc Rulers. This seemed the perfect time to add this lesson as I’ve a new quilt pattern coming out in October that utilizes several different types of units.

IMG_0157.jpg
Template 4.jpg

Half-Square Triangles are the easiest units to trim to size and can be done without any specialty rulers. I’m using a left over HST unit from making Sweet Home roofs as an example in this tutorial.

Stitch two triangles together using a 1/4” seam allowance or make HST units according to a pattern instructions. Press unit open.

For this example I’m using a 6-1/2” square Creative Grids ruler that has a 45° diagonal line marking as well as the normal grid line markings. A square ruler works best for HST units.

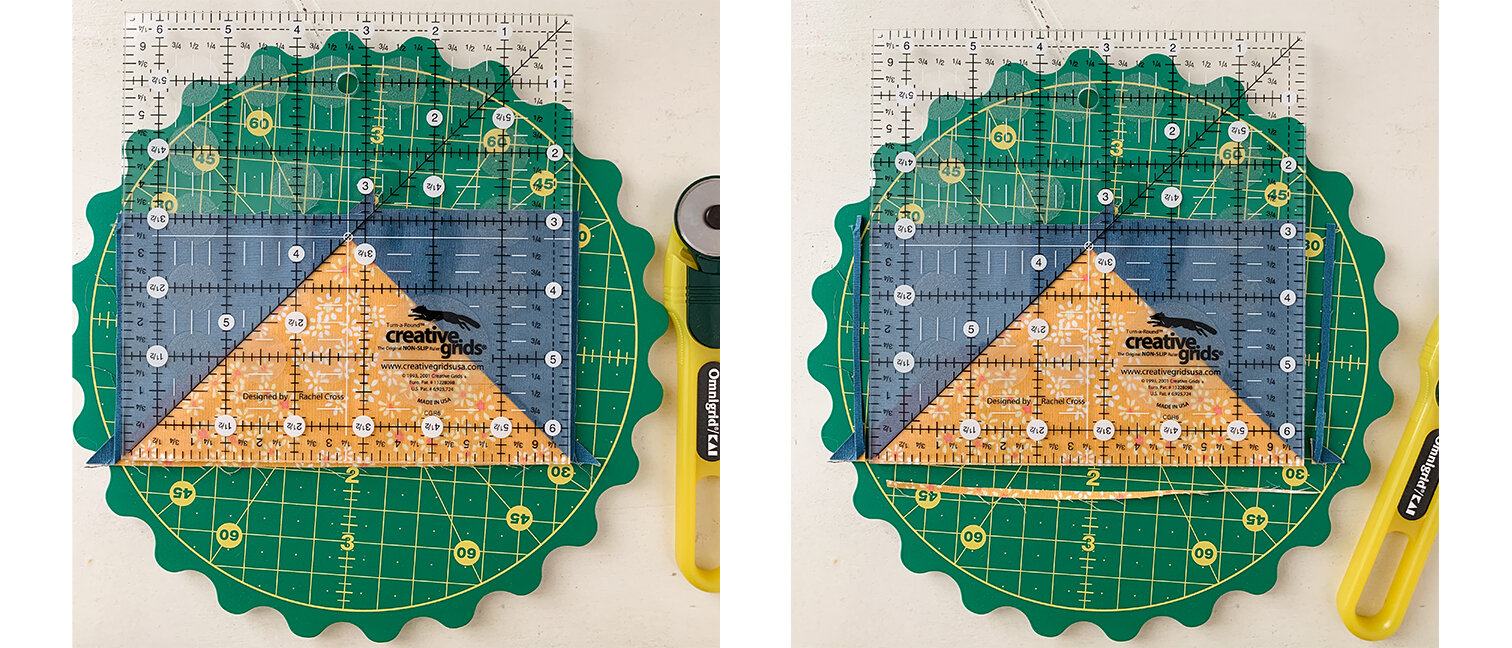
In the above left image, use the ruler to size up the HST to see what usable size can be made by lining up the 45° marking with the seam line and making sure there’s at least a 1/4” seam allowance on all side. As you see, a 4’’ square or smaller can be made from this HST unit.

With the ruler in position, trim the top and right sides of the HST with a rotary cutter as seen in the above right image. Reverse these instructions if you’re left handed.

Template 5.jpg

If working on a rotating mat, rotate everything 180° without disturbing the HST. If on a stationary mat, turn the HST so the trimmed sides are opposite of their starting point.

Slide the ruler down so the diagonal marking still aligns to the seam line and the 4” markings line up with the newly trimmed edges. Trim the two remaining sides to square the HST.

Template 6.jpg


The image above uses the same method to trim a HST unit to 5” square using a regular 6-1/2” square ruler and a 6-1/2” square Bloc_Loc ruler.

Trimming Flying Geese Units

Template 1.jpg

Flying Geese units take just a little more care when trimming and squaring to size. A regular square ruler is still the best tool for this job if you don’t have a specialty Flying Geese ruler for trimming.

I happen to have a square ruler the same width as what’s needed for my Flying Geese unit but a larger ruler would be just as useful but require a few more passes to cut since you could only cut up to two sides at once with a larger ruler.

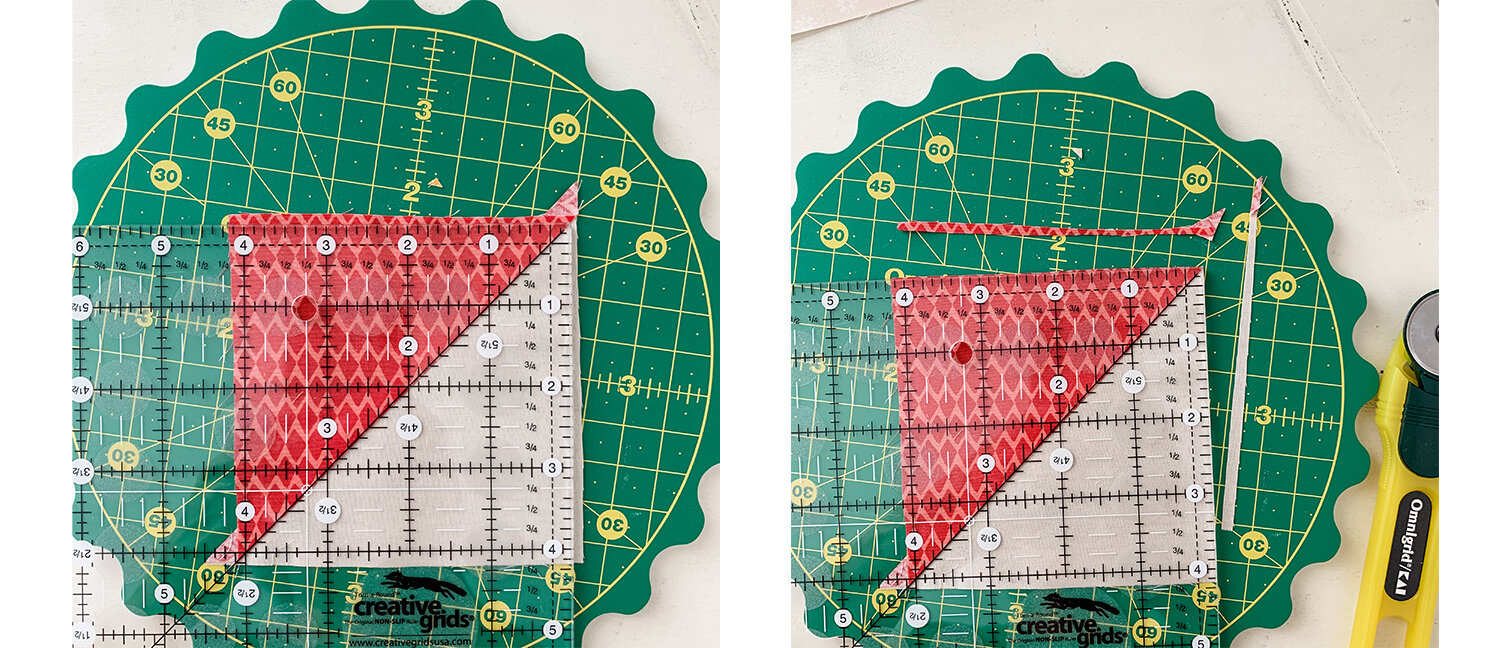
Determine the cut size of your Flying Geese unit. In this case I need to trim my unit to 3-1/2” x 6-1/2”. Subtract 1/4” from the height of the unit. Example: 3-1/2” minus 1/4” is 3-1/4”. This is well marked on my ruler as it’s the center of this 6-1/2” ruler. Place the measurement mark (in this case 3-1/4”) on the point of the Goose. The point of the Goose is used as the reference point and will help establish the 1/4” seam allowance. Note how the 45° marking on the ruler lines up with one seam line on the unit and there’s enough fabric on all sides of the Flying Geese unit for trimming.

Template 2.jpg

Trim both the sides and bottom edge of the unit as shown. If your ruler is larger, trim bottom and one side of unit.

Template 3.jpg

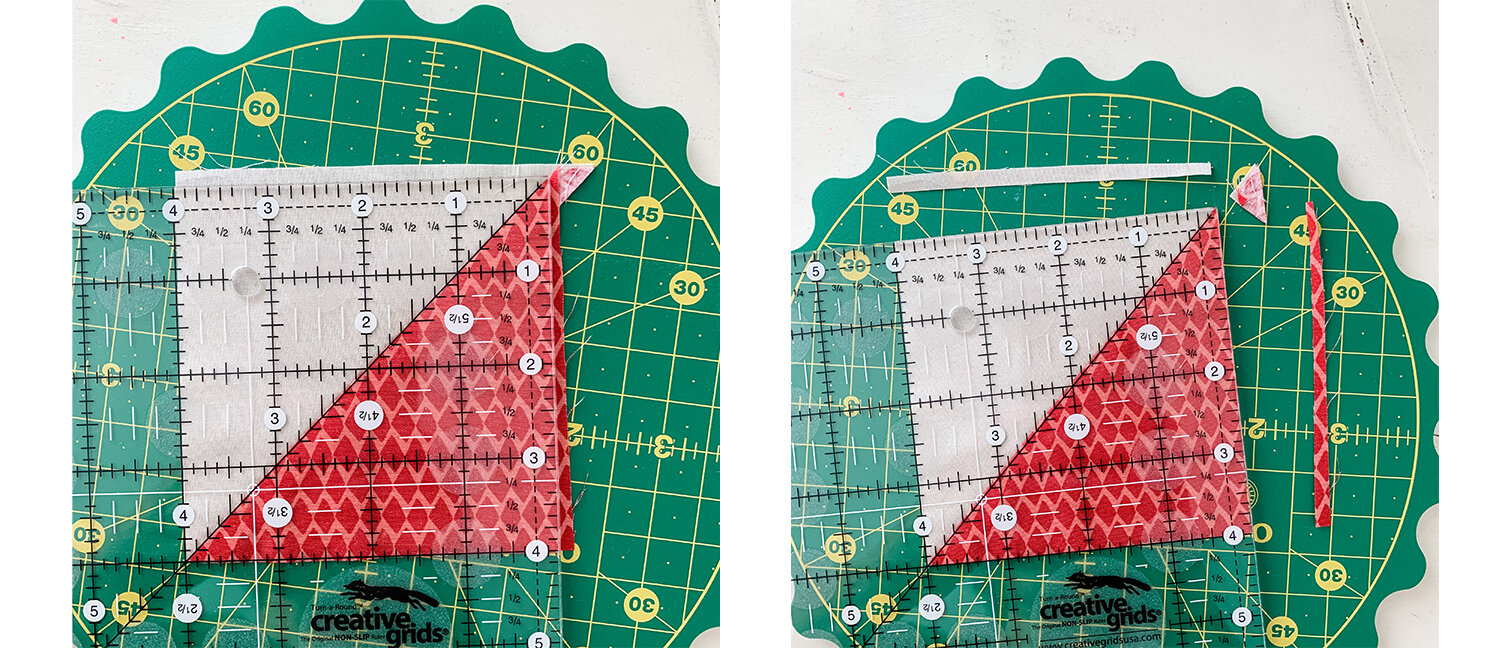
Rotate the unit or mat so the Goose now points down. Align the 3-1/2” mark (or the cut size needed) with the trimmed bottom edge of the unit (now located at the top).

Trim the Goose point edge and remaining side, if necessary so all outside edges have been trimmed as needed to size which includes the 1/4’’ seam allowance.

Template 8.jpg

Above shows the no-measure needed trimming of a Flying Geese unit using a Bloc-Loc Ruler.

There are other rulers on the market that are considered specialty rulers and cover more than one size of unit. I’ve only used the Bloc_Loc rulers but have heard good things about the Wing Clipper ruler from other quilters. Here are some examples available on Amazon using affiliate links:


HST Pile.jpg

Having all your units true to size will make patchwork assembly a breeze and no more fudging or wrestling your pieces into place. There’ll be no more clipped points, or wonky blocks. Taking time to trim and square up units is all part of the patchwork process and since you’ve already put in so much time and money into your beautiful quilt It’s well worth the extra effort to assure it’s made as well and as near perfect as it can be!

Happy trimmings!

Sweet Home Quilt Along Giveaway Week 3

Sweet Home Quilt Along Giveaway Week 3

Omnigrid Giveaway-02.jpg

Each Friday, throughout the Sweet Home Quilt Along, there’ll be a Giveaway. Your QAL hosts, Maureen Cracknell , Jennifer Jones, and myself have coordinated special giveaway prizes with our amazing participating sponsors for each and every week! If you've happened to miss the first Sweet Home QAL post, take a look back and read about it HERE then follow the posts in chronological order until you get caught up.

These Friday blog posts will highlight the Sponsor and awesome giveaway prize offered for this week’s QAL giveaway. The randomly drawn winners will be selected from the growing Instagram hashtag pool the following Monday around 4 pm Eastern with the winner(s) announced on Instagram.

Recent #SweetHomeQAL posts in the Instagram hashtag pool

Recent #SweetHomeQAL posts in the Instagram hashtag pool

Is your Instagram post featured in this #SweetHomeQAL hashtag pool snapshot for this week???

We’re using Instagram as a Sweet Home QAL community share spot where we can follow along and comment on each others quilt progress and share beautiful photos of our work.

Every time you share a post to your public instagram account and use the official #SweetHomeQAL hashtag in your post caption your post is automatically entered into the giveaway hashtag pool! That’s right—it’s as easy as that—just do what you’d do anyway! So, to up your chances, post a lot of of progress shots of your fabric pull, cut pieces, blocks, sashing, assembly, tops, and ultimately, finished quilts.

You may notice I keep saying you need a public Instagram account to be entered into the giveaway drawings. That’s because if you have your IG account set as a private account, Instagram does not add any hashtags to hashtag pools from private accounts—it’s just the way they roll. So, you may want to go into your IG settings and turn your account to public for the QAL or if not, and I totally get the need for privacy in this strange world we live in, just know that you won’t be eligible for the giveaways.

SWEET HOME QAL SPONSORS

Sweet Home QAL Sponsors.jpg

TODAY'S FEATURED SWEET HOME QAL SPONSOR IS Omnigrid!

Untitled-1.jpg

Omnigrid® is a family of measuring and cutting products. When Omnigrid® tools are used together they provide quilters, sewists and DIY aficionados with unsurpassed accuracy and quality. A product concept born of the genius of Peggy and Randy Schafer, Omnigrid® products work behind the scenes allowing makers to flawlessly bring their creations to fruition. - See more at: Omnigrid!

Products  *  Projects and Patterns  *  Instagram  *  Pinterest 

We hope you enjoy visiting Omnigrid!

For this week's Sweet Home QAL Giveaway, Ominigrid is offering an incredible prize of the wonderful Omnigrid sewing/quilting products shown below! Please note that this prize will be limited to winners within the United States only, sorry international friends.

Omnigrid Giveaway.jpg

THIS PRIZE PACK INCLUDES:  

8” Rotating Cutting Mat Omnigrid | 2-1/2’’ x 8’’ Omnigrid Ruler | 4’’ x 8’’ Omnigrid Ruler | 28mm Rotary Cutter

Thank you Omnigrid for this generous prize!

Sweet Home Bungalow Blocks-02.jpg

Don’t forget to share your Sweet Home quilt makes with your fellow quilt along makers over on Instagram and you’ll automatically be entered into this week’s drawing if you have a public IG account. One winner will be drawn from the growing hashtag pool on Monday, September 28th around 4 pm Eastern and the winner will be tagged and notified on Instagram.

Be sure to follow along on all three host’s blogs as well as our Instagram accounts: Me @sharonhollanddesigns , Maureen @maureencracknell , and Jennifer @penelopehandmade

I also want to let you know that during the QAL Jennifer and I plan to have impromptu IGTV live videos to give you tips and tricks for sewing your Sweet Home Quilt.

View my IGTV Sweet Home QAL series

View Jennifer’s IGTV story

Sweet Home QAL Schedule.jpg

Next Wednesday for week 4, we’ll be piecing our Corner Square blocks and adding the sashing to put together the Sweet Home quilt top!

—Happy sewing

I am an Amazon Associate site and earn from qualifying purchases on the products I’ve linked below. The helpful products selected are the same or similar to materials used to make the project(s) in this blog post or related items I think you may enjoy.

Hold Tight Sew Along Week #2

Hold Tight Sew Along Week #2

Hold Tight Sew Along 2 Sq cover.jpg

Welcome to Week #2 of the Hold Tight Sew Along! For this blog post, and the following two posts, I'll be share tips and tutorials to bring your quilting skills to a new level. No longer will curved piecing hold you back from stitching a quilt with curves! 

If you don't have the pattern already, you'll want to purchase the Hold Tight PDF pattern from my Shop page or from our friends at Fat Quarter Shop who now carries this pattern as well as Hold Tight quilt kits. These blog posts serve to supplement the instructions but don't provide the detailed pattern information that you'll find in the PDF available for purchase. The Hold Tight pattern will have your material list, cutting requirements, full-size templates, and be fully illustrated. My supplementary blog posts are just that, supplementary and meant to guide you along as you sew and give general patchwork sewing information for anyone sewing curves.

Hold Tight Sew Along Banner web.jpg

From March 20 until April 10, 2019 I'll be breaking down the key components of the Hold Tight baby quilt pattern into four manageable tutorial blog posts. These tutorials will be useful to anyone working with fabric and patchwork regardless what quilt is being made. In addition to my written posts, I’ve adding skill-building demonstration videos to further your learning experience. The videos support Weeks #1 through #3 and you’ll find these helpful videos on my Sew Along page. All the videos will be available on Week #1 of the sew along for those wanting to work ahead and will stay a permanent feature to resource in the future.

If you’ve just discovered this blog or only just heard about this sew along, there’s still plenty of time to join in on the fun and take part in the sponsored giveaway prizes for each week of the event. To get up to speed, take a look at the Week #1 posting dedicated to color selection and working with colors like a designer.

Hold Tight Ombré Desert closeup.jpg

I’ve just finished a top for my third Hold Tight quilt! To give myself a color palette challenge I decided to find a color palette inspiration from Pinterest and let that determine the look of this quilt.

Colour Crush from Love Print Studio Blog

Colour Crush from Love Print Studio Blog

I fell in love with this terra cotta, coral, clay, forest green, and golden palette and knew that Art Gallery Fabrics carried so many Pure Solids in these ranges that coming up with a palette based on this Love Print Studio mood board would be a snap!

Hold Tight - Ombré Desert Color Way.jpg

The morning of my fabric pull I was walking the dog and marveling at the blue sky when it dawned on me that an ombré background would be an awesome addition to this already earthy, southwestern-looking color palette—was I right???!!! My top is all pieced and am waiting for some Hobbs Poly-Down batting to arrive so I can quilt it. I’ve decide to use my Art Gallery Fabrics Destination Aerial print from my Tapestry collection as the backing and it could be any more perfect!

Hold Tight - Ombré Desert Color Way List.jpg

As promised, I want to share the fabric selection information with you. Now, be warned that doing an ombré background you’ll need to double the amount of background fabric for this quilt because of the size and odd shapes of the pieces create a lot of waste and left over fabrics. I used six gradient fabrics for horizontal rows of color with the two middle blues being used in two horizontal rows. Altogether you’ll need 25 colors (or 27 if each background row is a different gradient) to make a Hold Tight quilt with an ombré background. The rest of the yardage is unchanged.

Cutting Templates and Fabrics

The Hold Tight PDF pattern comes with the full-size templates which already include the seam allowances. Be sure when printing out your PDF pattern that you set you printer to 100%, no scale. Select a US letter paper size and deselect any borderless option (no borderless). Each template page has a 1” square reference square to check for printing scale accuracy. It’s extremely important you print the templates to true size.

Hold Tight Templates 1.jpg

With a permanent marking tool, trace the shapes onto heavy template plastic. I highly recommend Dritz Heavy Duty Template Plastic. Transfer shape letter information, grain line arrow. When tracing the Block Trimming Template, include the seam allowance and curves onto your template. Cut templates out with household scissors. Learn more about creating templates from the Hold Tight Sew Along Week #2 video found on my Sew Along page.

Hold Tight Templates 2.jpg

Refer to the PDF pattern for strip cutting information and number of pieces to cut. Let template straight edges and grain line marks help you to align the templates onto the fabrics for cutting. A 28 mm rotary cutter is highly suggested for cutting around curves. Use the extra guides of rotary cutter rulers when working on straight edges.

Tip: To help hold the template in place while cutting, roll Washi tape onto itself to make double-sided tape. Adhere the rolled tape onto the back of a template shape in 2-4 places. Fabric can be rotated for cutting ease without disturbing the template position and the taped template can be reused several times before the tape looses it stickiness.

Hold Tight Template Cutting 1.jpg

When cutting the B shape pieces, utilize the straight edge of the strip to cut the first shape then rotate the template to make the second cut which leaves an oval shaped scrap. For more demonstrations on cutting see Week #2 video.

Unfortunately, curved patchwork comes with waste pieces. If you plan to do additional curved sewing like trying your had at my free Orange Peel Table Runner these waste pieces can be cut down into smaller sizes and used. Start a bin of castoff curves for that next project.

Hold Tight Template Cutting 2.jpg

Stitching, pressing, and squaring up of a finished block will be covered next week and also in Week #3 Sew Along video Part 1 and 2 but I put this image here to show the importance that the template markings play in creating the Block Trimming Template.

HoldTightSewAlong Sponsor.jpg

A sew along’s a lot more fun with sponsors and giveaways, right!? Our friends at Dritz Sewing, the Fat Quarter Shop, Hobbs Batting, and Omnigrid have generously provided the Hold Tight Sew Along with products I know you’ll love! Every Friday I’ll be posting weekly a giveaway on Instagram. By using the hashtag #HoldTightSewAlong on Instagram every time you post sew along photos to a public account (private account posts don’t show up in hashtag pools) your IG account is automatically entered into the weekly sew along drawings! Ideas for what to share include your sew along progress, the “I’m a maker” sew along badge found HERE, your fabric pull, blocks, and finished quilt. Be sure to follow me on Instagram @sharonhollanddesigns so you never miss a thing!

THIS WEEK'S GIVEAWAY SPONSOR IS from DRITZ Sewing and Omnigrid

HTSA Dritz_Omnigrid Giveaway.jpg
Dritz Shower Rings Repurposed.jpg

If you’re wondering why I selected Dritz Shower Curtain Rings to be part of this giveaway package it’s because I love using everyday object in new ways and find this size shower ring to be so handy for keeping template pieces together, organizing swatch cards, note cards, bobbins, keys, etc. Anytime you can organize your work area is a good day, right?

Please note that this giveaway package is for US residence only (sorry, international friends, due to overseas shipping costs I’m asked by our sponsor to keep this giveaway US only.)

Don't forget the giveaways for this sew along are held on Instagram (not on the blog) and winning names are randomly drawn from the posts in the hashtag pool. By posting images of your Hold Tight color inspiration, fabric pull, blocks, or quilt. Use the official #holdtightsewalong hashtag every time you post your makes (to a public account) and you're automatically entered into the weekly IG drawings! See my Instagram Friday giveaway posts @sharonhollanddesigns for full details. 

Hold Tight Sew Along

Hold Tight Sew Along

Hold Tight Sew Along Sq.jpg

Since adding the Hold Tight baby quilt pattern to my Shop last week there’s been such an amazing response to this pattern and so many sales that I thought it would be a great pattern for a sew along.

Hold Tight.jpg

Hold Tight is a throw-size baby quilt made with 20 different Art Gallery Fabrics Pure Solids colors and curved patchwork pieces. Those two features make this quilt a tiny bit more challenging than typical straight-piece patchwork. But, don’t let this intermediate level pattern stop you from trying it—neither of these these aspects are as hard as you may think! Read more about this quilt from the original blog post—Hold Tight Quilt.

Hold Tight Sew Along Banner web.jpg

For the very reason that this quilt pattern has skill challenges makes it the perfect quilt to build tutorials around! In fact, for this sew along I’m even going the extra mile and creating accompanying You Tube videos to go with the different steps for piecing the quilt.

Hold Tight Sew Along Sq.jpg

Every Wednesday from March 20th until April 10th I’ll post a tutorial here on the blog covering tips and tricks for taking your patchwork to the next level. There’s no special sign up for this sew along. The only thing you’ll need for sewing along (other that materials for the quilt) is to purchase the pattern from my Shop page.

Week #1

I’ll share with you how I work with colors. This basic color theory knowledge is something that transcends beyond working with fabrics in patchwork and can be helpful if you’re an artist/hobbiest, decorating your home, putting together your wardrobe, or anything that has to do with color. Balloons and the transparency effect of balloons overlapping is the graphic hallmark of this quilt design and the possibilities for color combinations are endless. The Hold Tight quilt pattern calls for 20 different solids which can feel a bit overwhelming so I’ll be giving you some tools for knowing where to start and how to select your colors. I’ll be using Art Gallery Fabrics Pure Solids material in my quilts and fabric pull examples.

The You Tube videos for this sew along will all be available on the first week for those of you that would like to work ahead (as this quilt will not take four weeks to complete). Just be sure to snap pictures of your progress as you sew so you can share your progress on Instagram. I’ll be using the official #HoldTightSewAlong hashtag on Instagram to grow a hashtag pool for sew along giveaways. Read more about the giveaways below.

Week #2

Templates have been included in the PDF pattern for the three different shapes used to create blocks as well as a Block Trimming templates. Transferring your templates to template plastic and cutting out the fabric shapes will be covered in week #2. I’ll have tricks for making your cutting easier.

Week #3

For those that have shied away from curved piecing because it looks too hard will find out just how easy curved piecing can be with week #3 pinning, stitching, and pressing tutorials. Create absolutely square blocks and perfect seam allowances.

Week #4

The finish line! Put all the blocks together, baste, quilt, and bind your Hold Tight quilt. Week #4 and beyond is the big reveal weeks. Show off your make and don’t forget to use the #HoldTightSewAlong hashtag and tag me @sharonhollanddesigns when posting to social media.

HoldTightSewAlong Sponsor.jpg

A sew along is a lot more fun with sponsors and giveaways, right!? Our friends at Dritz Sewing, the Fat Quarter Shop, Hobbs Batting, and Omnigrid have generously provided the Hold Tight Sew Along with products I know you’ll love!

Hold Tight Sew Along Badge.jpg

GIVEAWAY

Every Friday, beginning on March 22nd, 2019 I’ll be posting the weekly giveaway on Instagram. By using the hashtag #HoldTightSewAlong on Instagram every time you post sew along photos to a public account (private account posts don’t show up in hashtag pools) your IG account is automatically entered into the weekly sew along drawings! Ideas for what to share include your sew along progress, the I’m a maker sew along badge, your fabric pull, blocks, and finished quilt.

Be sure to follow me on Instagram @sharonhollanddesigns so you never miss a thing!

HOLD TIGHT PATTERN GIVEAWAY Now Closed. Congratulations to: Rita Long, Laurie Reissler, and Teri!

Note: This giveaway is open to EVERYONE! If you're a "no reply" or anonymous commenter, please remember to include your email address in your comment--you can't win if I can't get a hold of you!

1. Simply leave a comment here under this post! (First comment entry).

2. Follow me @sharonhollanddesigns on Instagram (see link above). Just let me know that you do/did by making a separate comment here to record that entry. (Separate comment-second entry). 

3. Help spread the word!! I know that many of you already do, so I thought it would be nice to add that as another way to enter! Spread the word about being a Hold Tight Sew Along Maker on YOUR instagram, Facebook, Twitter, Pinterest by pinning any of my pretty images in this post (separate comment-third entry). 

That’s THREE possible entries! Enter now through Monday, March 18th! I’ll randomly pick THREE winners from the comments on this post around 4 pm Eastern time on Monday. I’ll post the names of the winners on this post once they've been notified and responded to my emails.

Don't forget to enter into this same giveaway on Instagram! Look for my PDF pattern giveaway post where you simply leave a comment on that post and tag a friend. I’ll be giving away a total of 10 PDF patterns through Instagram—that’s one for the commenter and one for the tagged friend—so five randomly drawn comments.

Use the official #HoldTightSewAlong hashtag every time you post your Hold Tight makes (to a public IG account) and you're automatically entered into the weekly IG hashtag pool drawings that start on March 22nd! See my Instagram giveaway posts @sharonhollanddesigns for more chances to win this week’s PDF pattern giveaways. 

Happy sewing!

Sharon